QR Code SAP Device Type using Barcode Writer in Pure Postscript
Ever since coming across a QR code in my passport I have wanted to integrate them into SAP. I like the idea of a "quick response" of data into a mobile device as I hate typing on mobile phone keyboards. Now this is a technical solution and no business case is provided, however the flight demo SAP sapscript and smartforms which will be covered later offer an interesting use of QR codes (in my opinion).
Still unsure about QR codes, then try the Wikipedia link
See them in action here with Google's favourite places advert
All download files now on GitHub https://github.com/rjruss/SAP-QR-Code-and-other-2d-Barcode-Device-Types/tree/main
I am more of an system integrator/administrator than a developer so I found,
*) the application to do the actual QR code generation, Terry Burton's Barcode Writer in Pure Postscript, here
*) For simplicity I use the Cute PDF writer to generate the PDF via SAPlpd. A mention must go out to Ghostscript as this is used to do the actual QR Code PDF conversion. So this needs to be installed as per the instructions for Cute PDF writer.
*) Configure ABAP list program/SAPSCRIPT/SMARTFORMS to use the device type printer controls to generate the QR Codes.
Here is how to generate QR codes in SAP.


The ZBWIPPQR.PRI is a plain text file which you can open with any text editor to check it out.
2) Import output device FILE = zbwipp.txt
Download text file ZBWIPP.TXT for import here
next screen enter ZBWIPP.txt as the file name (use the directory where you downloaded the file)
3) Install Cute PDF writer from here
(direct download here http://www.cutepdf.com/download/CuteWriter.exe )
It is important to install with the PS2PDF option, so answer yes at the following prompt.

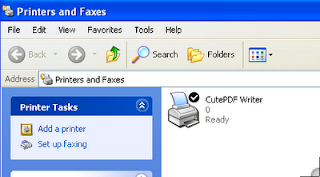
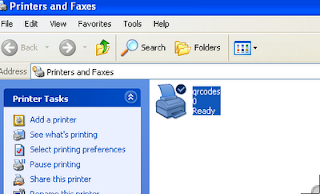
RENAME Cute PDF Writer printer to qrcodes as shown here.
Before
After
Why rename the printer to qrcodes?
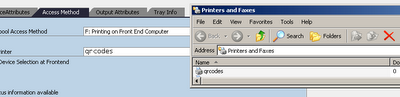
This must be renamed to qrcodes to match the imported output device as shown below in the SPAD output screen. (SAPLPD will now use the printer qrcodes, in this way it does NOT interfere with any other SAP frontend printer settings you may have).
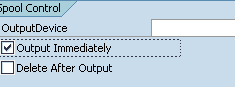
5) To enable frontend printing please ensure the user settings for spool control are set to "output immediately" in SU01.
Defaults TAB screen shot of the setting required. (make sure it is set, log off and check it again :)
6) Import the following example ABAP code to test QR codes in SAP.
From transaction SE38 create ABAP report ZQR_PRINT.
Cut and paste the text from this file found here ZQR_PRINT
Ignore any warning only messages relating to NEW-PAGE PRINT ON, this is purely used as a simple method to allow the ABAP code to use the printer controls in the device type.
Activate the program as the message is only a warning. This is only a test for ABAP list prints.

Now run the ZQR_PRINT report
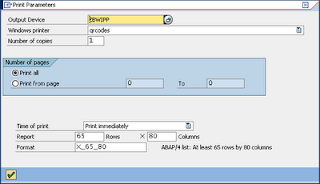
Select ZBWIPP as the output device in the following print parameter screen.
*please note that the options shown here purely depend on the options you have active in the user settings. So its important, as previously stated, to have already set print immediately as one of the options.
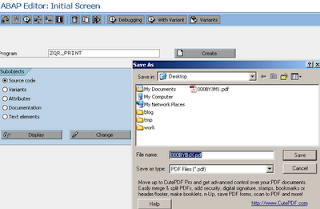
After selecting the green tick mark, then after a short while you should have a prompt to save a PDF file.
7) The actual QR Code PDF document should look something like this....
8)... to be continued and the simple next step to use the printer controls in SAPSCRIPT and SMARTFORMS.
The YouTube videos for smartforms and sapscript now below....
*the video also shows other barcode examples.
1) The DataMatrix device type can be downloaded here
2) The Aztec Code device type can be downloaded here
*Not shown in the video but also available
3) The MaxiCode device type can be downloaded here
I am more of an system integrator/administrator than a developer so I found,
*) the application to do the actual QR code generation, Terry Burton's Barcode Writer in Pure Postscript, here
*) For simplicity I use the Cute PDF writer to generate the PDF via SAPlpd. A mention must go out to Ghostscript as this is used to do the actual QR Code PDF conversion. So this needs to be installed as per the instructions for Cute PDF writer.
*) Configure ABAP list program/SAPSCRIPT/SMARTFORMS to use the device type printer controls to generate the QR Codes.
Here is how to generate QR codes in SAP.
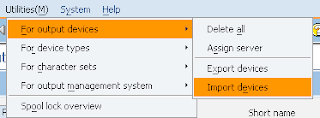
1) SPAD - Import device type FILE=ZBWIPPQR.PRI
You can download the ZBWIPPQR device type here

On the next screen enter ZBWIPPQR as the device type name

The ZBWIPPQR.PRI is a plain text file which you can open with any text editor to check it out.
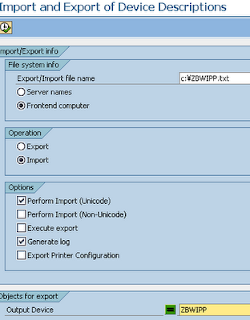
2) Import output device FILE = zbwipp.txt
Download text file ZBWIPP.TXT for import here

next screen enter ZBWIPP.txt as the file name (use the directory where you downloaded the file)

3) Install Cute PDF writer from here
(direct download here http://www.cutepdf.com/download/CuteWriter.exe )
It is important to install with the PS2PDF option, so answer yes at the following prompt.

RENAME Cute PDF Writer printer to qrcodes as shown here.
Before

After

Why rename the printer to qrcodes?
This must be renamed to qrcodes to match the imported output device as shown below in the SPAD output screen. (SAPLPD will now use the printer qrcodes, in this way it does NOT interfere with any other SAP frontend printer settings you may have).

5) To enable frontend printing please ensure the user settings for spool control are set to "output immediately" in SU01.
Defaults TAB screen shot of the setting required. (make sure it is set, log off and check it again :)

6) Import the following example ABAP code to test QR codes in SAP.
From transaction SE38 create ABAP report ZQR_PRINT.
Cut and paste the text from this file found here ZQR_PRINT
Ignore any warning only messages relating to NEW-PAGE PRINT ON, this is purely used as a simple method to allow the ABAP code to use the printer controls in the device type.
Activate the program as the message is only a warning. This is only a test for ABAP list prints.

Now run the ZQR_PRINT report
Select ZBWIPP as the output device in the following print parameter screen.
*please note that the options shown here purely depend on the options you have active in the user settings. So its important, as previously stated, to have already set print immediately as one of the options.

After selecting the green tick mark, then after a short while you should have a prompt to save a PDF file.

7) The actual QR Code PDF document should look something like this....

8)... to be continued and the simple next step to use the printer controls in SAPSCRIPT and SMARTFORMS.
The YouTube videos for smartforms and sapscript now below....
*the video also shows other barcode examples.
1) The DataMatrix device type can be downloaded here
2) The Aztec Code device type can be downloaded here
*Not shown in the video but also available
3) The MaxiCode device type can be downloaded here
*Check out the general page for more information in regards to barcode printing in SAP with the Barcode Writer in Pure Postscript
Check out my SCN blogs here.
SAPSCRIPT Video
If you are interested in the following screenshot, then follow this link.
