Background
This blog was inspired by an email from Amazon.
An extract of the email is below and a highlighted section that got my attention ;)

The section in the email about losing all my data didn’t seem right! Now to be fair to Amazon I did recover my instance and reading the details in the email there was some great help to assist me in the process. Although I was under the impression that once in the cloud keeping the data/server safe was in someone else’s hands and nothing to be concerned about. The email did prompt me to think about documenting/keeping the information in another format in case either I lost access myself or it was taken away by the provider of the instance. I will state that Amazon did offer links in the email to their documentation on how to use their services in a redundant way. Although I was more interested in recovering my data and then finally switching off the Amazon instance.
To make the connection to this my SQL Anywhere blog, the actual Amazon micro instance was running a copy of SQL Anywhere. So the email did trigger an idea to capture some of the things I had done with SQL Anywhere in a blog. Using the blog to document the learnings I had made from using SQL Anywhere in an hopefully interesting way for you, dear reader, and for myself for future reference. The actual reason I did place my developer edition in the Amazon cloud was due to the fact that I thought I had a copy of the free SQL Anywhere web edition version (however that web edition version was actually discontinued a while back). I have actually shut down my Amazon cloud now as I have a running local developer edition. I have chosen to share my experiences in building/re-creating an SQL Anywhere Developer Edition on Ubuntu Linux running in VirtualBox.
Installing SQL Anywhere 17
I first checked what were the supported Platforms for SQL Anywhere 17.
Ubuntu was mentioned at version 12 although Ubuntu has since moved on to version 16. In the detailed Linux document, the actual Linux kernel version tested is listed.
From my experience the current available version of Ubuntu 12 comes with an updated kernel which is out of the tested kernel range. So as I would be running an untested kernel anyway I chose to install Ubuntu 16.
Also to mention after all those checks, I run the operating systems on virtual machines on a Macbook pro with Ubuntu 16 on Virtualbox 5.0.10. So not directly matching the supported platforms ;) anyway. So my intention is to recreate (and improve) the code I had running in the Amazon cloud on my local installation.
I have previously found downloading SQL Anywhere a bit of an issue, however it does appear that the downloads are a lot more straightforward at the moment. After registering at the following link, an email arrived and I could download the software.
Install Steps
Version of Ubuntu I used was ubuntu 16.04 LTS desktop 64 bit edition.
Actual versions of some of the specifics
kernel uname -r 4.4.0-21-generic
glib ldd (Ubuntu GLIBC 2.23-0ubuntu3) 2.23
ncurses and ldap higher versions than those tested.
glib ldd (Ubuntu GLIBC 2.23-0ubuntu3) 2.23
ncurses and ldap higher versions than those tested.
JAVA version
sudo apt-get install default-jdk
java -version
openjdk version "1.8.0_03-Ubuntu"
OpenJDK Runtime Environment (build 1.8.0_03-Ubuntu-8u77-b03-3ubuntu3-b03)
OpenJDK 64-Bit Server VM (build 25.03-b03, mixed mode)
I downloaded SQL Anywhere for Linux 64 bit file and extracted it to a temporary location.
From the readme file
Installing SQL Anywhere 17
--------------------------
1. Change to the created directory and start the setup script by running
the following commands:
cd ga1700
./setup
I couldn’t find ga1700 but found the extracted directory was sqlany17
I then installed as root - sudo su
I chose a new installation and no registration key for the developer edition and only installed the 64 bit version. The files were installed in the directory /opt/sqlanywhere17
After software install I setup the SQL Anywhere environment
source "/opt/sqlanywhere17/bin64/sa_config.sh"
I started SQL Central program and created a database called sql17 following default prompts but choosing unicode UTF8BIN where I had the choice.
I then set up this database to use the services I had running in my original cloud version. Also what follows is my interpretation of the information about SQL Anywhere and it is always worth cross checking any information below with the great help provided for SQL Anywhere 17 at the following link.
Setup SQL Anywhere’s Web Server
I have used SQL Anywhere’s in built web server a lot as it saves a lot of other configuration and I have always been impressed about all the functionality that SQL Anywhere provides. Back in 2013 I used SQL Anywhere to help me analyse the @scnblogs twitter timeline. I used UI5 running with the inbuilt web server and set it up following the methods mentioned in this blog
The end result was a UI5 table of the @scnblogs twitter timeline that I used in my 2013 analysis of the @scnblogs timeline, as shown below.
However for my new SQL Anywhere 17 setup I found the below SCN wiki entry which looked an ideal way to setup the web server. This method covered a lot more internet Media / MIME types in a way I preferred. The original setup only catered for some standard image and CSS formats, whereas the wiki entry catered for all the Apache HTTPD media types.
One issue I had with the wiki content was with the tabbed content from the Apache web page. I had problems loading the data into the table after formatting it with the sed command in the wiki text. I used /root/www as the directory for my SQL Anywhere web server as a replacement in the wiki process. Also I swapped out the sed command in the end for the following.
#download the apache mime type file
wget http://svn.apache.org/repos/asf/httpd/httpd/trunk/docs/conf/mime.types
wget http://svn.apache.org/repos/asf/httpd/httpd/trunk/docs/conf/mime.types
# I used the following tr command instead of the sed command to format the text
tr -s '\t' '\t' < mime.types > mime.types2
Then I used the load table command from the wiki.
LOAD TABLE www_mime_types (mimetype,extensions)
FROM '/var/tmp/mime.types2'
DELIMITED BY '\x09'
COMMENTS INTRODUCED BY '#'
I made sure I had completed the steps from the wiki page and I double checked the www_mime_types table contained valid entries. E.g.
select * from www_mime_types;
select * from www_mime_types where extensions = 'png';
As part of writing this blog and checking my own work :) I made subsequent checks of the sed command. It revealed I had caused my own issues in the way I transferred the Apace file to my desktop. Using the wget command to directly transfer the file to my computer the sed command worked fine. However the tr command was the method I originally used.
Download and Setup OpenUI5
I downloaded the OpenUI5 SDK from the following link
Extracted to /root/www/ui5 as I had used /root/www as the base directory for my web server service.
Setup SSL
I had originally set up my cloud based web server with SSL and signed my own SSL certificates using the approach from various blogs on the internet. I had setup SQL Anywhere to run a web server using HTTPS and this was the only way I could use SQL Anywhere for my HANA Cloud Portal Movie entry covered here. Also to set up public trust I did generate a certificate signing request so that Let’s Encrypt would allow my site to be trusted on a global level.
For my new installation I wanted to setup HTTPS again. I was consuming HTTPS based APIs so it was a motivation to use HTTPS for my web server. This was mainly due to the fact that Chrome can redirect a lot of HTTP traffic to HTTPS by default and as I mentioned in my HCP cloud movie blog, Chrome doesn’t like to mix secure and nonsecure content. During the setup process I did learn about Chrome’s “strict transport security” and the ability to turn it off. I did have some issues with my Ubuntu hostname redirecting all HTTP to HTTPS in Chrome for my SQL Anywhere web server. I wanted to stick with the developer tools in Chrome on my Mac. So the ability to setup SQL Anywhere with HTTPS and consume the Twitter and Bitly APIs over HTTPS made sense. To keep things simple I chose to use the SQL Anywhere createcert command to create a self-signed root certificate this time - shown below.
Also worth reading the SCN wiki page on certificates as this comes in useful for the setup to run the HTTPS web server.
createcert
SQL Anywhere X.509 Certificate Generator Version 17.0.0.1358
Warning: The certificate will not be compatible with older versions
of the software including version 12.0.1 prior to build 3994 and version 16.0
prior to build 1691. Use the -3des switch if you require compatibility.
Enter RSA key length (512-16384): 2048
Generating key pair...
Country Code: GB
State/Province: West Midlands
Locality: Solihull
Organization: Mine
Organizational Unit: Hawbridge
Common Name: sqlany17.haw
Enter file path of signer's certificate:
Certificate will be a self-signed root
Serial number [generate GUID]:
Generated serial number: 0d27d3d626a911e68000a3cb392ac262
Certificate valid for how many years (1-100): 5
Certificate Authority (Y/N) [N]:
1. Digital Signature
2. Nonrepudiation
3. Key Encipherment
4. Data Encipherment
5. Key Agreement
6. Certificate Signing
7. CRL Signing
8. Encipher Only
9. Decipher Only
Key Usage [1,3,4,5]:
Enter file path to save certificate: cert.pem
Enter file path to save private key: key.pem
Enter password to protect private key: PASSWORD
Enter file path to save identity: id.pem
The command to start my SQL Anywhere database and web server with HTTPS (and HTTP) is as follows.
dbspawn dbsrv17 -xs "HTTP(port=8081;TO=3600)","HTTPS(port=8443;FIPS=N;IDENTITY=
"/home/robert/ssl/id.pem";IDENTITY_PASSWORD={PASSWORD};TO=3600)" /home/robert/sql17
db/sql17
I use the dbspawn command as shown in the line above to start SQL Anywhere. This way the database will start as a background task. The text in bold is how I setup the HTTPS web service. I use port 8443 for https communication. The id.pem file is the last filename generated by the createcert command earlier. This is a combination of the certificate and private key. And the PASSWORD is not PASSWORD ;) but the real password for my setup. The TO=3600 sets a timeout which I will cover later on.
Once my database has started I can access the index page of OpenUI5
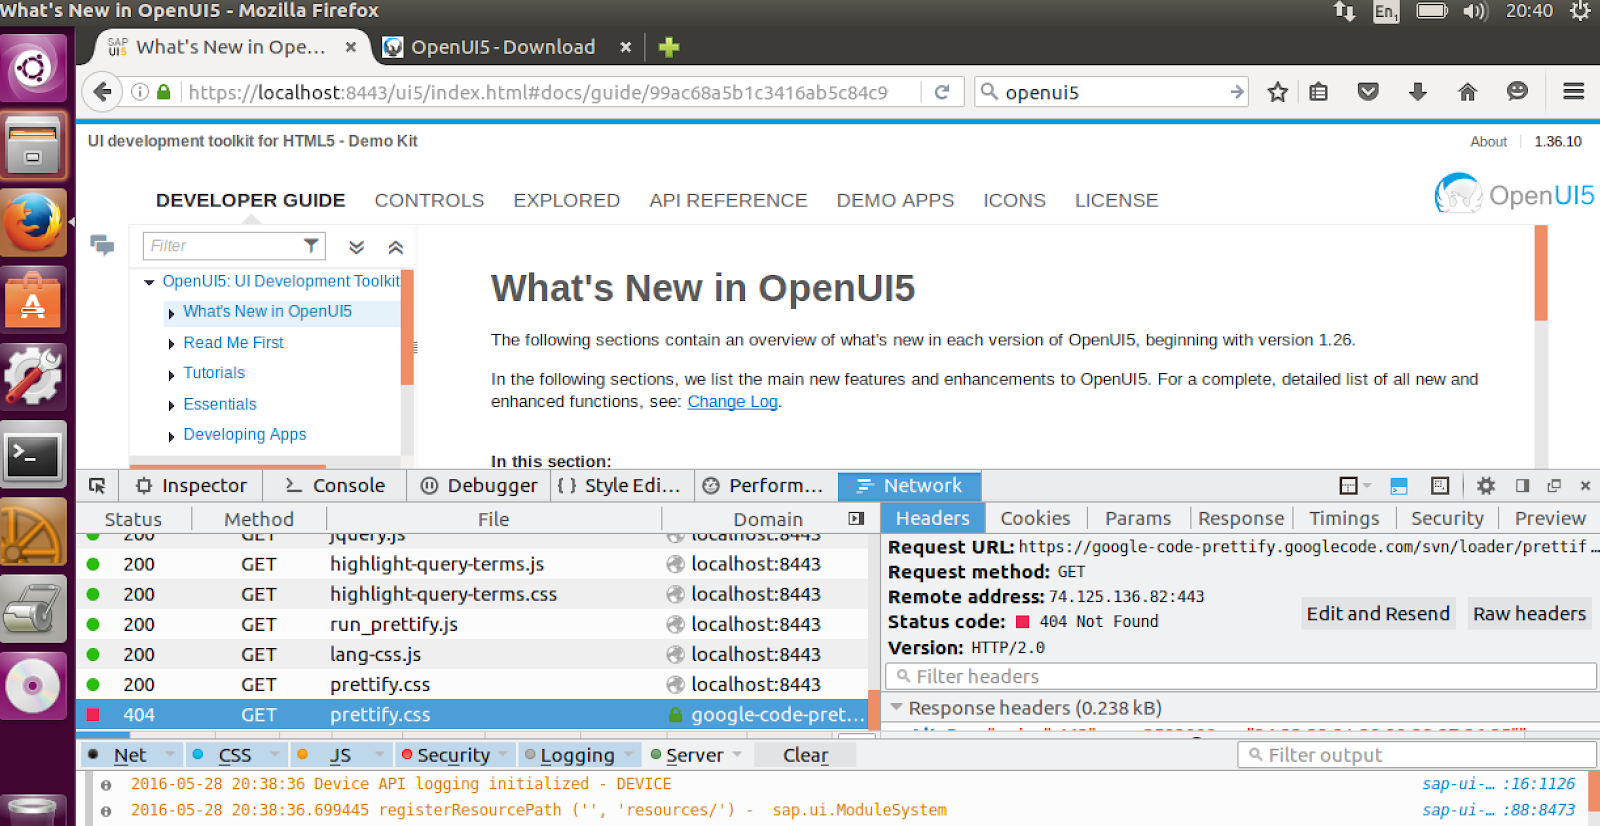
I checked the web console in Firefox on my Ubuntu system to check for any missing files or general errors/issues. The only failure was a prettify.css load from Google, as shown above but I did not investigate that issue. I checked a few of the pages and reference links and the local OpenUI5 installation was working as I wanted, with no major issues.
I am so impressed with SQL Anywhere and what it can do and there is more and probably lots more that I have still to discover. I have been using SQL Anywhere over the couple of years now and it seems unfair to call it a database as it can do so much more than what I would call a database (there are other databases out there ;) which are more than just a “database” but SQL Anywhere can, dare I say, run anywhere).
So next up was to setup the twitter API to query the @SCNblogs timeline again on my local installation.
Setup of Twitter API
In my original setup in my cloud version I had used a version of the twitter API that could be used to actually send out tweets and involve user interaction. By using openssl commands and SQL Anywhere’s ability to execute operating system commands and read files from the server I was able to read the @SCNblogs twitter timeline. This time out however I chose to do something a bit more straightforward and use Twitter’s application only API. This API version is limited in the number and type of endpoints you can use however it can read a Twitter users timeline. Therefore ideal for my use case and a big advantage in that SQL Anywhere can consume this application api with its in built capabilities (no need for me to rely on openssl and external files).
To set this up I used SQL Anywhere’s web services, functions and procedures to make the Twitter API call. An OpenUI5 based web page would use these SQL Anywhere features to create my table of SCNblogs tweets.
First I need to get authorised to use of the Application only twitter API. The actual Twitter endpoint I will use is.
I used an existing app (or a new one could be created) that I had registered at Twitter’s app page.
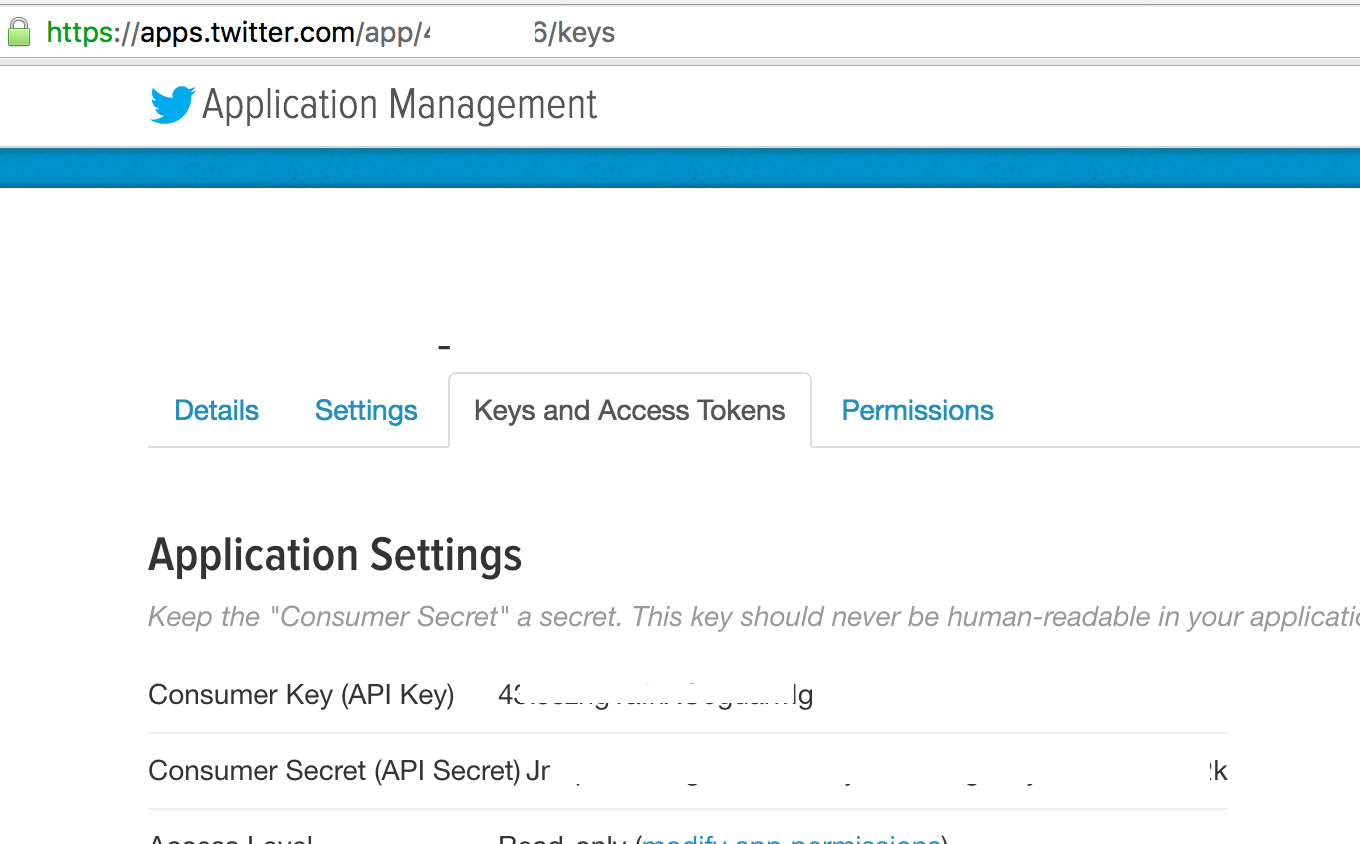
I needed the Consumer Key and Secret
I used them in an SQL Anywhere procedure and function to get a bearer token that I would use to authorisation for the Twitter API calls later.
A function called “twitter_bearer_f” that will generate the bearer token.
CREATE FUNCTION "dba"."twitter_bearer_f"( in "u" long varchar,in "h" long varchar, in body long varchar )
returns long varchar
url '!u'
certificate 'file=/var/tmp/twit2'
type 'HTTP:POST:application/x-www-form-urlencoded'
header '!h';
A procedure called “twitter_auth” that will use the Consumer Key and Secret to pass to twitter to get the bearer token.
CREATE PROCEDURE "dba"."twitter_auth"() result ( html_string LONG VARCHAR )
BEGIN
DECLARE K long VARCHAR ;
DECLARE S long VARCHAR ;
DECLARE BKS long VARCHAR ;
DECLARE h long VARCHAR;
DECLARE u long VARCHAR;
--Twitter API key
set K = '{REPLACE WITH CONSUMER KEY}';
--Twitter API secret
set S = '{REPLACE WITH CONSUMER SECRET}';
--Twitter BASE64 of <API key>:<API Secret>
set BKS = BASE64_ENCODE(string( K ,':',S));
--Twitter use SQL function to get Bearer Token
set u = 'https://api.twitter.com/oauth2/token';
set h = string ('Authorization: Basic ', BKS );
--Use function to get the Bearer Token from Twitter
select twitter_bearer_f(u, h, 'grant_type=client_credentials');
END;
I ran the twitter_auth procedure from Interactive SQL to generate the bearer token.

Now that I had the bearer token I no longer required the procedure twitter_auth or the function twitter_bearer_f. I created a new procedure and function to actually search a user's twitter timeline. I also created an SQL Anywhere web service to be used by my OpenUI5 page to call the procedure with the chosen twitter user and number of tweets to search.
The Function ztwitterBASE_f
ALTER FUNCTION "dba"."ztwitterBASE_f"( in "u" long varchar,in "h" long varchar )
returns long varchar
url '!u'
certificate 'file=/var/tmp/twit2'
type 'HTTP:GET'
header '!h'
The Procedure ztwitterBASE - and I replaced the B varchar definition to equal the bearer token created earlier
ALTER PROCEDURE "dba"."ztwitterBASE"(in T LONG VARCHAR , in c integer) result ( html_string LONG VARCHAR )
BEGIN
DECLARE B long VARCHAR ;
DECLARE U long VARCHAR ;
DECLARE cCOM long VARCHAR ;
DECLARE h long VARCHAR ;
// CALL sa_set_http_header('Content-Type', 'text/javascript');
set U = 'https://api.twitter.com/1.1/statuses/user_timeline.json?screen_name=';
set B = '{REPLACE WITH BEARER TOKEN}';
set cCOM = string( U , T , '&count=', c);
--SET Timeouts as it appears every request needs at least 30 seconds?
--not sure yet whether thats Twitter API or SQL Anywhere related reason
CALL sa_set_http_option('SessionTimeout', '5');
SET TEMPORARY OPTION remote_idle_timeout = 100;
set h = string ('Authorization: Bearer ', B);
select ztwitterBASE_f(cCOM, h);
end
And finally the web service that would be used by my OpenUI5 page called “ztwitAPP_w”
CREATE SERVICE "ztwitAPP_w" TYPE 'RAW' AUTHORIZATION OFF USER "dba" URL ELEMENTS AS call "ztwitterBASE"(:url1,:url2);
How I call this service with OpenUI5 is covered further on down….
Update the Bitly API
This time with SQL Anywhere 17 I found different way to load the Natural Earth Shapefile.
CALL st_geometry_load_shapefile ('/root/Desktop/ne/ne_50m_admin_0_countries.shp' ,
4326,
'countries' );
A Pain in the Certificate Chain
Unfortunately I did hit a snag with the Twitter and BITLY apis in that communication failed to due to certificate issues. The two related functions for Twitter and Bitly contain certificate lines and the twitter example is below.
certificate 'file=/var/tmp/twit2'
From my previous experience this file /var/tmp/twit2 contained the entire certificate chain used by Twitter and allowed the api calls to be made successfully. This all worked in the cloud version of SQL Anywhere.
The openssl command I had used in the past to obtain the certificate chains appeared to be working differently on my Ubuntu 16 installation.
The openssl command below does not return all the required certificates. It only returned the server and any intermediate certificate but the crucial trusted root certificate is not. I had a TLS handshake error which meant I was using an incorrect certificate chain. (the below command was documented in my Bitly SCN blog mentioned previously)
openssl s_client -connect api-ssl.bitly.com:443 -showcerts >/var/tmp/httpsBITLYcert2
I have a general interest in SQL Anywhere and do read some of the latest information that is published about it. This was how I did come to read Eric Farrar’s blog using SQL Anywhere with the HANA Cloud Platform for the Internet of Things. My main takeaway from the blog (although it is great to see SQL Anywhere being used for many more things) was that Eric only used the root certificate to setup the trust. I had brought other SAP related experience into the assumption that the entire certificate (excluding the actual target server’s) chain would be required to enable the trust. So now my openssl command was actually no use at all ! I only had to use the root certificate but how to get this.
The Joys of Twitter’s API authentication
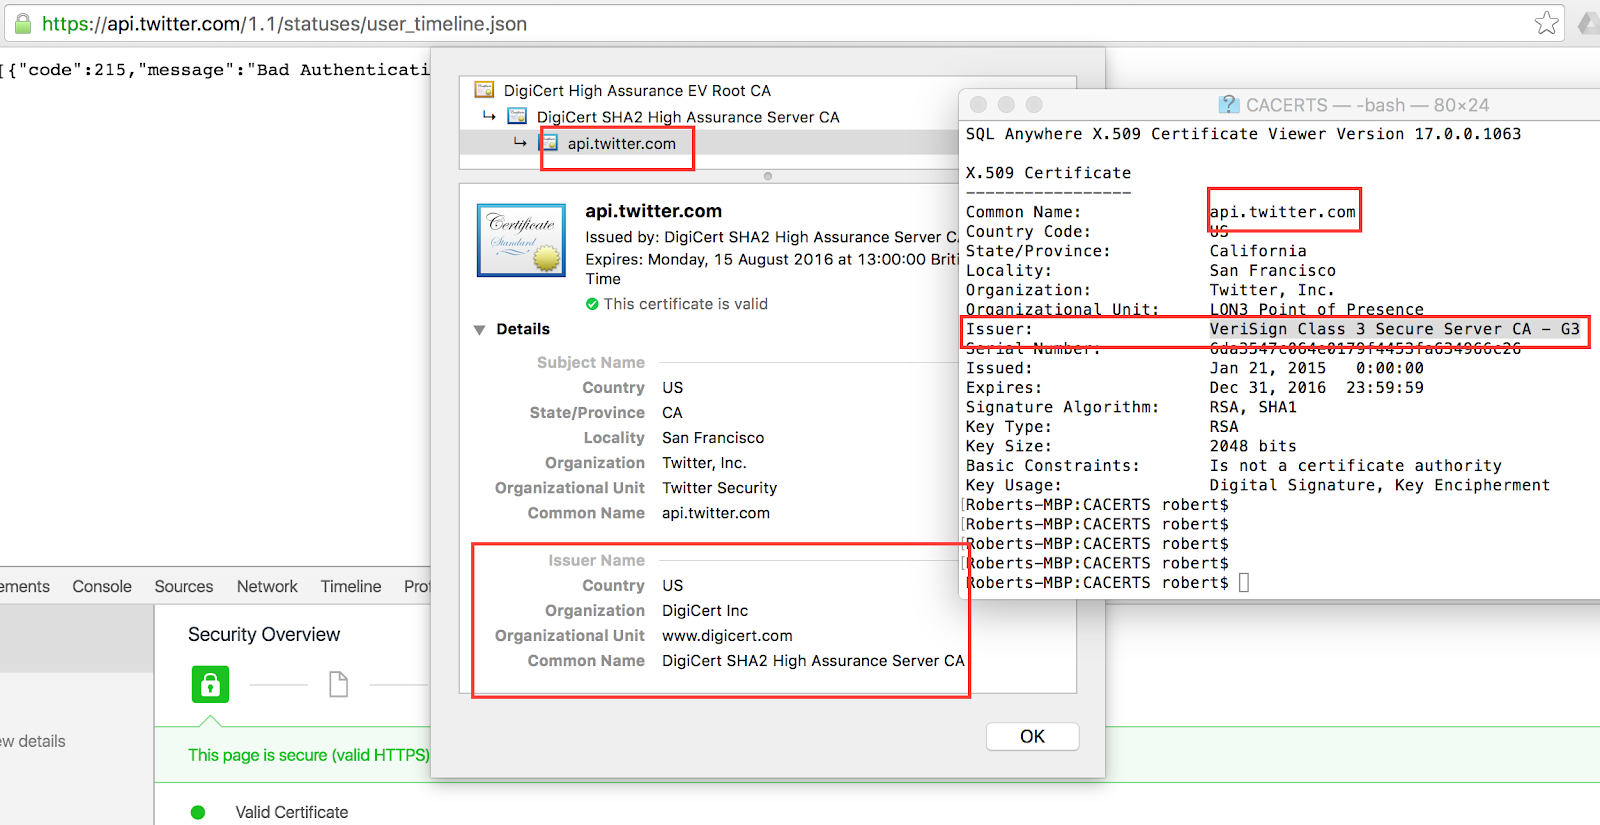
Twitter in their developer guides do point out that they recommend to use all Verisign and Digicerts root certificates in your applications trusted root store. I did trip over what I thought was a misleading browser certificate (from Digicert) and the actual working certificate I ended up using from Verisign. Screenshot below showing server and intermediate certificates for the browser based access on the left compared to the certificate returned via an openssl call from the command line on the right.
Viewcert to the rescue
As I was still getting the TLS handshake errors with the “Digicert High Assurance EV Root CA” root certificate I started to check the actual calls to twitter. Using the same openssl command as before, I actually used the SQL Anywhere command viewcert to query the certificates returned. I created a temporary file for the intermediate certificate “Verisign Class 3 Secure Server CA - G3” and queried it with viewcert.
viewcert inter.cer
SQL Anywhere X.509 Certificate Viewer Version 17.0.0.1063
X.509 Certificate
-----------------
Common Name: VeriSign Class 3 Secure Server CA - G3
Country Code: US
Organization: VeriSign, Inc.
Organizational Unit: VeriSign Trust Network
Organizational Unit: Terms of use at https://www.verisign.com/rpa (c)10
Issuer: VeriSign Class 3 Public Primary Certification Authority - G5
Serial Number: 6ecc7aa5a7032009b8cebcf4e952d491
Issued: Feb 8, 2010 0:00:00
Expires: Feb 7, 2020 23:59:59
Signature Algorithm: RSA, SHA1
Key Type: RSA
Key Size: 2048 bits
Basic Constraints: Is a certificate authority, path length limit: 0
Key Usage: Certificate Signing, CRL Signing
The Issuer line, underlined, above actually turned out to be the root certificate I needed to make it work. I downloaded the “VeriSign Class 3 Public Primary Certification Authority - G5” root certificate and used this in my SQL Anywhere function. As per Eric’s blog I mentioned earlier, the operating system usually has the trusted CAs available and in Ubuntu’s case these can be found in /etc/ssl/certs. The Verisign certificate was also available in this Ubuntu directory.
So lesson learnt for me to try various access methods to a server to query the root certificates. Or just have one BIG file containing all the root certificates in the world ;).
Timing Out
I do have an inconsistent timeout with the SQL Anywhere procedures that I am still investigating. The workaround/fix at the moment is to allow an extended time out with the following lines in the Bitly and Twitter procedures (I have added these lines to the original Bitly based code shared previously).
CALL sa_set_http_option('SessionTimeout', '5');
SET TEMPORARY OPTION remote_idle_timeout = 100;
Bring it together with OpenUI5
I now had my API calls ready I now needed to update my original UI5 page that controls the process. This time out I get the last 5 tweets of the @SCNblogs timeline into a table and allow a user to select a row to map the related Bitly links. The code can be found below and a screenshot of the resulting page.
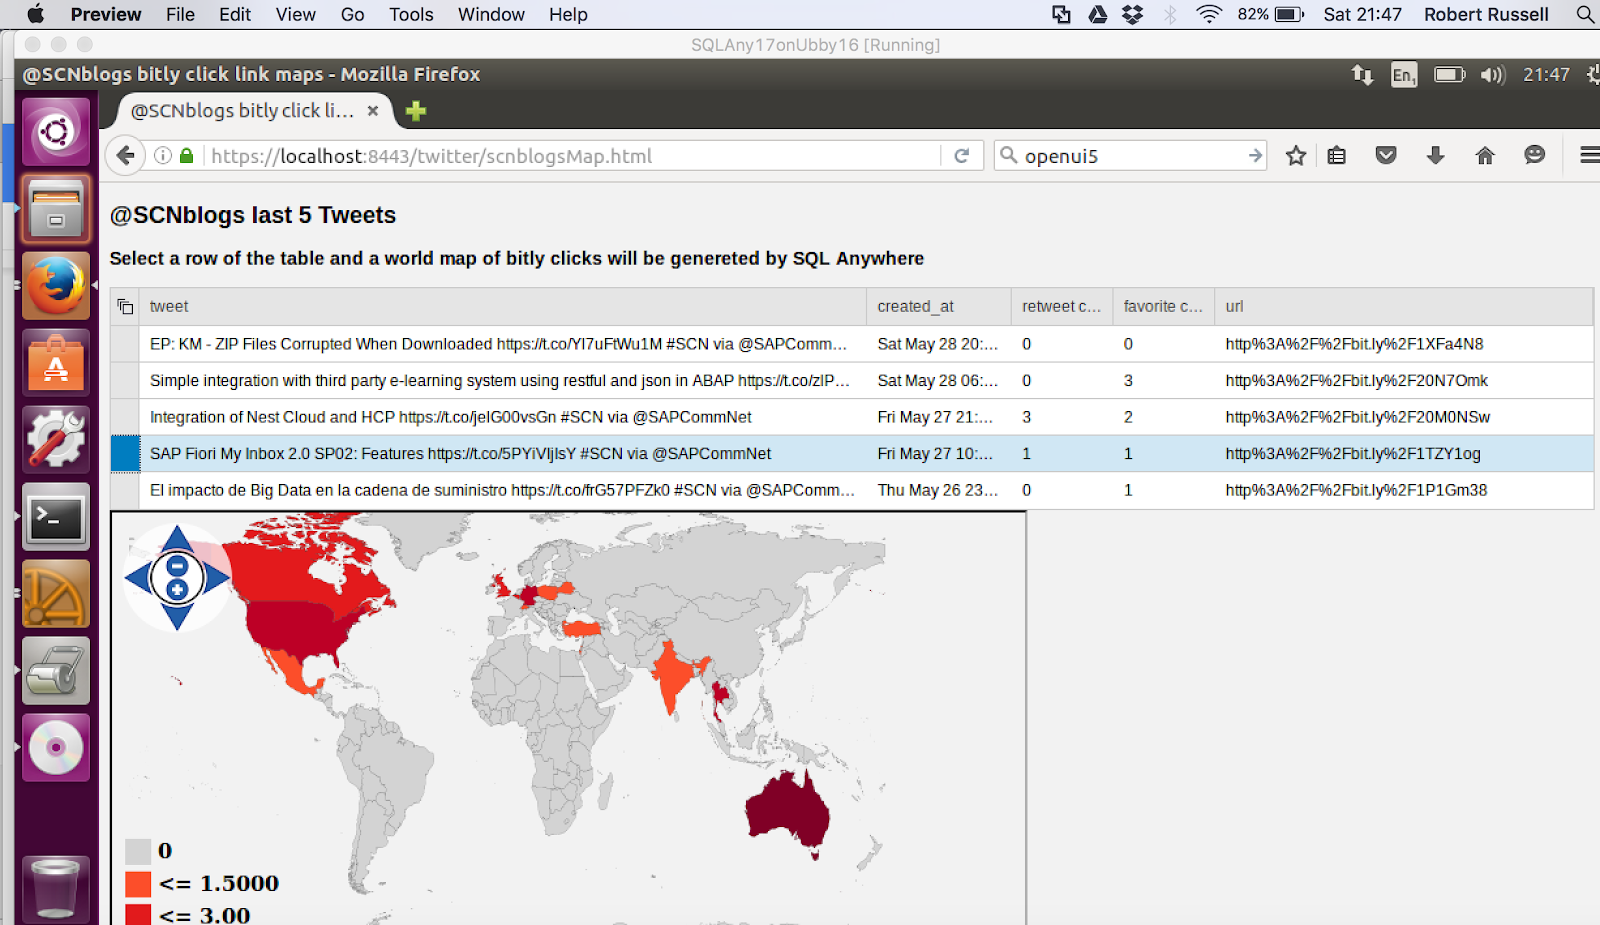
The OpenUI5 table shows the last 5 tweets from the @SCNblogs timeline and if a row is selected from the table, a map of the country's clicking on the link will be shown. I use an iframe to get around some of the zoom and pan control issues I had with the Bitly SVG map and OpenUI5 table on the same page.
The two lines that call the SQL Anywhere procedures are
Twitter API SQL Anywhere procuedure call
url: "../ztwitAPP_w/scnblogs/5"
Bitly API SQL Anywhere procedure call
sbu = "../SCNblogsBITLYmap/" + bu;
Some known issues with the page.
I allow multiple selections on the table but it will only map one selected row.
The following oTable* line in the code detects the selected row to map the bitly link. I actually disabled a table sort feature as I actually wanted the contents of the actual table cell. With this line, I pick up the contents of the original data. So when the table was sorted it actually returned incorrect data - the cell content had changed but the original data value is returned. I’ll come back to this when I can explain it better ;) .
// get the bitly url to map from the selected row.
*oTable.getContextByIndex(drow).oModel.oData[drow].entities.urls[0].expanded_url;
The overall page works as I want it to right now and I am impressed with SQL Anywhere that I can achieve it all running on the database ( - much more than a database :)).
Thanks for reading and I end with the final OpenUI5 page.
scnblogsMap.html code which I created in directory /root/www/twitter/
<!DOCTYPE html>
<html>
<style>
.center {
margin: auto;
width: 60%;
padding: 10px;
}
</style>
<head>
<meta http-equiv='X-UA-Compatible' content='IE=edge' />
<title>@SCNblogs bitly click link maps </title>
<!-- Load UI5, select gold reflection theme and the "commons" and "table" control libraries -->
</head>
<body class='sapUiBody'>
<div id='header'>
<h2>@SCNblogs last 5 Tweets</h2></div>
<div id='main'>
<h3>Select a row of the table and a world map of bitly clicks will be genereted by SQL Anywhere</h3></div>
<div id='content'></div>
<iframe id="bittymap" src="about:blank" width="700" height="400" marginwidth="0" marginheight="0" scrolling="no"> </iframe>
<div id='footer'>
<h3>Page created with SQL Anywhere - UI5 & jquery</h3></div>
</body>
<script id='sap-ui-bootstrap' type='text/javascript'
src='../ui5/resources/sap-ui-core.js'
//data-sap-ui-theme='sap_goldreflection'
data-sap-ui-theme='sap_bluecrystal'
data-sap-ui-libs='sap.ui.commons,sap.ui.table'></script>
<script>
var oTable = new sap.ui.table.Table({editable:true, visibleRowCount:5});
var oControl = new sap.ui.commons.TextView().bindProperty("text", "text");
oTable.addColumn(new sap.ui.table.Column({label: new sap.ui.commons.Label({text: "tweet"}),
template: oControl,
autoResizable: true,
setWidth : "100px",
flexible: true,
resizable: true,
}));
var oControl = new sap.ui.commons.TextView().bindProperty("text", "created_at");
oTable.addColumn(new sap.ui.table.Column({label: new sap.ui.commons.Label({text: "created_at"}),
template: oControl,
autoResizable: true,
width : "10%",
flexible: true,
resizable: true,
}));
var oControl = new sap.ui.commons.TextView().bindProperty("text", "retweet_count");
oTable.addColumn(new sap.ui.table.Column({label: new sap.ui.commons.Label({text: "retweet count"}),
template: oControl,
autoResizable: true,
flexible: true,
resizable: true,
}));
var oControl = new sap.ui.commons.TextView().bindProperty("text", "favorite_count");
oTable.addColumn(new sap.ui.table.Column({label: new sap.ui.commons.Label({text: "favorite count"}),
template: oControl,
autoResizable: true,
flexible: true,
resizable: true,
}));
var oControl = new sap.ui.commons.TextView().bindProperty("text", "entities/urls" ,function(aValue) {
var bURLp = "";
if (aValue) {
jQuery.each(aValue, function(iIndex, oValue) {
sNumber = oValue.expanded_url;
bURLp = encodeURIComponent(sNumber);
})
return bURLp;
}
}
);
oTable.addColumn(new sap.ui.table.Column({label: new sap.ui.commons.Label({text: "url"}),
template: oControl,
autoResizable: true,
flexible: true,
resizable: true,
}));
var oModel = new sap.ui.model.json.JSONModel();
var aData =
jQuery.ajax({
url: "../ztwitAPP_w/scnblogs/5",
dataType: "json",
async:false,
success: function(data, textStatus, jqXHR) {
var JsonData = data;
oModel.setData(JsonData);
},
error: function(jqXHR, textStatus, errorThrown) {
alert("error");
}
});
oTable.setModel(oModel);
oTable.bindRows("/");
oTable.placeAt("content");
oTable.attachRowSelectionChange(function(oEvent) {
var sbu = "about:blank";
var currentRowContext = oEvent.getParameter("rowContext");
//var sTweet = oSystemDetailsML.getProperty("tweet", currentRowContext);
//var sUrl = oSystemDetailsML.getProperty("url", currentRowContext);
try {
var drow = oEvent.getSource().getSelectedIndex();
var bu = oTable.getContextByIndex(drow).oModel.oData[drow].entities.urls[0].expanded_url;
if ( bu === undefined ){
sbu = "about:blank";
}
else {
sbu = "../SCNblogsBITLYmap/" + bu;
}
} catch(e){
sbu = "about:blank";
console.log(e);
}
$("#bittymap").attr("src", sbu);
});
$( document ).ready(function() {
var ta = document.getElementById("__table0-table");
var tr = document.getElementById("__table0-rows-row4");
});
oTable.getColumns()[0].setWidth("50%");
oTable.getColumns()[1].setWidth("10%");
oTable.getColumns()[2].setWidth("7%");
oTable.getColumns()[3].setWidth("7%");
</script>
</html>
No comments:
Post a Comment